September 2019 to January 2020
Version: v5.2.30109.0931
What’s New
- Sign in with Microsoft
- Introducing Multi-Factor Authentication in OneStop Reporting
- Single sign-on with Microsoft
- Administration: New Budgeting user license
- Access to Data Manager is now a Permission
- Administration: Changes to Group User permissions
- Administration: Users are notified when they are added to a tenant
- Archive: Playlists now sorted by date
- Live Reporting/Budgeting: Upload, duplicate, create new, and download report or budget templates directly to Categories
- Live Reporting – Using the mouse to select range of parameter values in the lookup
- Static mode for reports: Remove or keep formulas in run report
- Help in current language from Report Designer
- Report Designer: Changes to Conditional storage Settings on the Budgeting tab
- Assignments: Download budget from assignment
- Fixes
Sign in with Microsoft
We have now enabled a Microsoft sign-in option for users when signing in to the OneStop Reporting portal.
Users can now choose to use their OneStop Reporting password, or click Sign in with Microsoft to use their Microsoft password.

NOTE: The first time you use Sign in with Microsoft, you must approve this as a sign-in method.
Set up new application in Azure Active Directory (AAD)
To be able to use AAD with the portal, you must register the portal as an app in your AAD tenant and retrieve the Application ID. See Microsoft documentation for more information.
Enable Azure Active Directory (AAD) in OneStop Reporting
- In the portal, click
 Settings then System settings.
 - Go to Azure Active Directory.
- Turn on the switch Enable Azure Active Directory.
- Enter the Application ID from Azure.
- Click Save.
Now, users can sign in to OneStop reporting using their Microsoft account.
If you want to enforce users to use Microsoft to sign in, see Require Azure Active Directory (AAD) sign-in for all users below.
Require Azure Active Directory (AAD) sign-in for all users
- In the portal, click Settings then
 Administration.
 - On the Overview tab, under SECURITY > AZURE ACTIVE DIRECTORY, enter the domain(s) to require Microsoft sign-in for all users. NOTE: The domain(s) you enter here, must be an Azure Active Directory domain(s).
- Click
 Add.
Add.

Now all users are required to use their Microsoft account password to sign in to OneStop Reporting and can no longer use their OneStop Reporting password.
NOTE: If users have access to multiple tenants where one requires Microsoft sign-in and another does not, then they are required to sign in again when switching to the tenant that requires Microsoft sign-in.
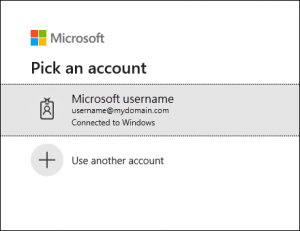
User signs in with Microsoft account when domain requires Microsoft sign-in
When an administrator has entered a domain under Require Azure Active Directory (AAD) sign-in for the given domains, users will get a Sign in menu where they are asked to select a Microsoft account.

Introducing Multi-Factor Authentication in OneStop Reporting
To enhance user security in OneStop Reporting, we have made it possible to use Multi-Factor Authentication (MFA) when signing in to the portal.
MFA is an enhanced security system that verifies a user’s identity by requiring two or more forms of authentication. Rather than just asking for a username and password, MFA requires additional credentials, such as a code from the user’s smartphone.
MFA is an effective way to provide increased security. Usernames and passwords can be stolen, and they have become increasingly susceptible to brute force attacks. MFA creates multiple layers of security to help increase the confidence that the user requesting access is actually who they claim to be.
With MFA, even if an attacker manages to learn the user’s username and password, it is useless without also having possession of the additional authentication method. In OneStop Reporting, MFA works by requiring two authentication methods:
- Something you know (username and password)
- Something you have (an authenticator app on your mobile device)

What is an authenticator app and how does it work?
An authenticator app is usually installed on a smartphone and you scan a barcode or enter a key to create an account. After the account is created, the authenticator app generates a 6-8 digit passcode every 30 seconds. The passcode can, for example, be used for login as an extra authentication method in addition to a username and password.
The passcodes are generated from a secret code that is shared between the service you are using, such as OneStop Reporting, and your device, as well as the current time.

Google Authenticator app example
Where can I get an authenticator app and which one should I use?
There are a variety of authenticator apps you can download to your phone from Google Play and the IOS App Store, but we recommend that you use Google Authenticator or Microsoft Authenticator, as those are the ones we have fully tested our MFA solution on.

Authenticator apps in Google Play
For more information about installing and setting up an Authenticator app, see Install and set up an Authenticator app
How can I get MFA in OneStop Reporting?
In OneStop Reporting, users can set up MFA from their user settings. In addition, administrators can enforce an MFA policy for all end users. See the user procedures below for more information:
- User enables and sets up Multi-Factor Authentication
- Administrator at top level enables Multi-Factor Authentication policy for all users
(Option 1) User enables and sets up Multi-Factor Authentication
- Take one of these actions:
- Click Settings >
 User settings.
 - On the Home screen, in the upper right-hand corner, click User options >
 Profile.
- Click Settings >
- On the My profile tab, under Security, turn on
 the Enable Multi-Factor Authentication switch.
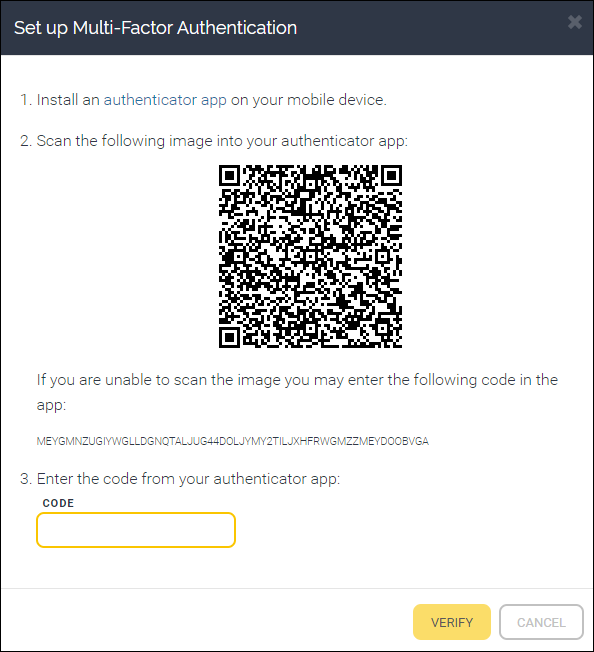
 - Install an authenticator app on your mobile device.
NOTE: You can, for example, use Microsoft Authenticator or Google Authenticator from Google Play or App Store. - Scan the image on the screen into your authenticator app.
NOTE: If you cannot scan the image, you can enter the code you see under If you are unable to scan…. - In the Code field, enter the code from your authenticator app.
- Click Verify.

You have now set up MFA for your OneStop Reporting user profile. The next time you log in to OneStop Reporting portal, you must enter your username and password, and then enter a verification code from your authenticator app.
Click here for video on how to set up MFA on your account:

User signs in to OneStop Reporting with Multi-Factor Authentication
- In the Username/Email field, enter your email or username.
- In the Password field, enter your password.
- In the Verification code dialog, enter the code from your authenticator app.
- Click Verify.
If you do not have a verification code, click the Do not have a code? link to read more about the MFA setup.
(Option 2) Administrator at top level enables Multi-Factor Authentication (MFA) policy for all users
- Click
 Settings >
  Administration.
 - On the Overview tab, under Security, turn on
 the Require Multi-Factor Authentication for all users switch.
NOTE: You can click the More information link to read more about Multi-Factor Authentication (MFA).
![]() Multi-Factor Authentication (MFA) policy is now enabled for this organization. All users must use MFA to sign into the underlying tenants and groups.
Multi-Factor Authentication (MFA) policy is now enabled for this organization. All users must use MFA to sign into the underlying tenants and groups.

User sets up MFA
If your administrator has enabled a Multi-Factor Authentication (MFA) policy for your organization, you will receive a message:
Your organization’s security policy requires you to set up Multi-Factor Authentication (MFA) for your account.
- Click Next.
- Install an authenticator app on your mobile device.
NOTE: You can, for example, use Microsoft Authenticator or Google Authenticator. - Scan the image on the screen into your authenticator app.
NOTE: If you cannot scan the image, you can enter the code you see under If you are unable to scan…. - In the Code field, enter the code from your authenticator app.
- Click Verify.
You have now set up MFA for your OneStop Reporting user profile. The next time you log in to OneStop Reporting portal, you must enter your username and password, and then enter a verification code from your authentication app.
User signs in to OneStop Reporting with Multi-Factor Authentication
- In the Username/Email field, enter your email or username.
- In the Password field, enter your password.
- In the Verification code dialog, enter the code from your authenticator app.
- Click Verify.
If you do not have a verification code, click the Do not have a code? link to read more about the MFA setup.
Single sign-on with Microsoft
If enabled by an administrator, users can now use the Microsoft sign-in option when signing in to the OneStop Reporting portal.
Users can now choose to use their OneStop Reporting password, or click Sign in with Microsoft to use their Microsoft password.

Enable Azure Active Directory (AAD) in OneStop Reporting
- In the portal, click
 Settings then
  System settings.
 - Go to Azure Active Directory.
- Turn on the switch Enable Azure Active Directory.
- Enter the Application ID from Azure*.
- Click Save.
Now, users can sign in to OneStop reporting using their Microsoft account.
* To be able to use AAD with the portal, you must register the portal as an app in your AAD tenant and retrieve the Application ID. See Microsoft documentation for more information.
Administrators can also require all users to use Microsoft to sign in. See Require Azure Active Directory (AAD) sign-in for all users below.
Require Azure Active Directory (AAD) sign-in for all users
NOTE: To be able to use AAD sign-in, you must have enabled AAD in System Settings and entered the Application ID from Azure.
- In the portal, click
 Settings then
  Administration.
 - On the Overview tab, under SECURITY > AZURE ACTIVE DIRECTORY, enter the domain(s) to require Microsoft sign-in for all users. NOTE: The domains you enter here, must be an Azure Active Directory domain.
- Click
 Add.
Add.

Now all users are required to use their Microsoft account password to sign in to OneStop Reporting and can no longer use their OneStop Reporting password.
NOTE: If users have access to multiple tenants where one requires Microsoft sign-in and another does not, then they are required to sign in again when switching to the tenant that requires Microsoft sign-in.
User signs in with Microsoft account when domain requires AAD
When an administrator has entered a domain under Require Azure Active Directory (AAD) sign-in for the given domains, users will get a Sign in menu where they are asked to select a Microsoft account.
Administration: New Budgeting user license
We are now introducing a new Budgeting license. Users with this license will have the possibility to budget directly in the Budgeting module. In the past, users were required to have a license for Report Designer to have access to the Budgeting module, but this is no longer necessary.
In addition to budget directly in the portal, they can download budget templates from the Marketplace, and then download the budgets locally if they want. Furthermore, they can assign budget templates to other users and roles. NOTE: This license does not allow users to upload or create budget templates.
Users with the Budgeting license will also get access to the Assignments and Workflow modules.

If given the Can edit data from Data Manager permission, they also have access to Data Manager. For more information, see section below.
Access to Data Manager is now a Permission
Users can now control access to Data Manager from Permissions in Administration.
To grant a user access to Data Manager;
- Click Settings > Administration.
- Click the relevant tenant.
- On the Users tab, click the user.
- Under Permissions, turn on the Can edit data from Data Manager switch.

Administration: Changes to Group User permissions
We have added an option in Administration for Group Users, so that users can be added with full access permissions in all subtenants (data access, drilldown, etc.) without being administrators.
The three options for Group Users are now:
- If you want to grant a user Group Administrator rights, turn on the
 Group Administrator switch. A Group Administrator can manage group users, and create new tenants and subgroups. In addition, they can manage licenses for users and manage the connections for the tenants in the group.
 - If you want to grant a user rights to manage users only for the tenants in the group, turn on the
 Manage users switch. This permission allows the user to see the Administration pages for the tenants in the group. Users with this permission will also automatically get All permissions.
 - If you want to grant a user all permissions for all tenant in the group, turn on the
 All permissions switch. This permission gives the user all Access Permissions in the tenants, such as full data access, importing company data, drill-down, etc. without having administrator rights. These users will not be able to see the Administration pages under Settings.

Administration: Users are notified when they are added to a tenant
When existing users are added to a tenant, they are notified with information about the user that added them to the tenant.
Archive: Playlists now sorted by date
Playlists in Archive are now sorted by date. In the past, users would see their unread playlists at the top of the list. We have changed this because most of our users are primarily interested in their most recent reports.
Live Reporting/Budgeting: Upload, duplicate, create new, and download report or budget templates directly to Categories
If you have ( ![]() ) selected a Category in Live Reporting or Budgeting, and select to upload, duplicate, create new, or download report/budget template(s) from the Marketplace, the report(s) is automatically added to the selected Category.
) selected a Category in Live Reporting or Budgeting, and select to upload, duplicate, create new, or download report/budget template(s) from the Marketplace, the report(s) is automatically added to the selected Category.
NOTE: You can select multiple categories to add report/budget templates to.


NOTE: Click here to learn more about managing categories in Live Reporting, or here to learn about managing categories in Budgeting.
Example: Automatically add new report templates to a Category or categories:
- In Live Reporting, in the Search & Filters pane, select the Category or categories you want to add report templates to.
- Click
 Get templates.
 - Select (
 ) the report templates from the list.
 - Click INSTALL.
- Click Cancel.
The report templates are added to the Category/categories you have selected.

Live Reporting – Using the mouse to select range of parameter values in the lookup
In the past, users had to press Ctrl/Shift to select multiple values in the parameter lookup. Now, users can click a value, then click again and scroll to select a range of values.
NOTE: This only applies to reports that allow multi-selection for parameters.

Static mode for reports: Remove or keep formulas in run report
Some of our users have very large reports, containing numerous cells with formulas, many that are referring to other cells and functions. This might cause performance issues when running reports in the portal. Therefore, we have made it possible to run reports in “static mode”. This means that all formulas are removed in the workbook and the values are replaced with actual cell values.
Users can control the formula settings for a report template from the Report Properties in Report Designer. On the Reporting tab, there is now a Keep formulas in run report checkbox. If this checkbox is deselected, the formulas are removed from the report.
- The default setting for existing reports is selected (True).
- The default setting for new reports is deselected (False).
NOTE: This option will not have any impact on budgets.
Keep formulas in run reports
- In Report Designer, on the OneStop Reporting tab, click Report Properties.
- Click the Reporting tab.
- Select the Keep formulas in run report checkbox.
- Click OK.
All formulas in the generated report are kept during processing.
Remove formulas in run reports
- In Report Designer, on the OneStop Reporting tab, click Report Properties.
- Click the Reporting tab.
- Clear the Keep formulas in run report checkbox.
- Click OK.
All formulas in the generated report are now removed during processing, and the values are replaced with actual cell values. When formulas are removed from a report, it is no longer possible to make calculations in run reports in Live Reporting.
When formulas are removed from the report template, the drilldown will function as normal.
NOTE: For reports that contain advanced formulas, such as IF and INDIRECT in the same formula or when referring to other sheets, it is safest to select the Keep formulas in run report checkbox to ensure the formulas work as intended in the portal.

Help in current language from Report Designer
In the past, users clicking the Help button in Report Designer would get the default language English. Now, users are redirected to the help in Norwegian, Danish or Swedish depending on their language settings.
Report Designer: Changes to Conditional storage Settings on the Budgeting tab
Store even unchanged cells has changed name to Store unchanged cells. The logic remains the same: This option will force data from this cell to always be stored. The application will not do a check whether the input cell has changed its value or not.
Ignore cell value 0 has changed name to Delete transactions if cell value is 0, and will now have the following logic:
- If the option is selected and the cell value is 0 (either entered or calculated), the underlying record will be deleted.
- If the option is deselected and the cell value is 0 (either entered or calculated), the number 0 will be stored in the underlying record.
- If the Delete transactions for empty cells checkbox is selected, and the user clears the cell by pressing delete or backspace (or by formula), the underlying record will always be deleted regardless of whether the Delete transactions if cell value is 0 option is selected or not.
Suppress delete has changed name to Delete transactions for empty cells. The logic remains the same: If this option is selected, the value is used to update existing/insert a record in the storage dimension. This will also apply to transactions where there has been a value that has now been set to 0/blank/deleted.

Assignments: Download budget from assignment
It is now possible to download a budget as an Excel file from an assignment in Assignments. The Download functionality is available both for single assignments from Budgeting and assignments in a workflow.

Fixes
Report Designer: Local date format
In the past, there have been issues when using, for example, the Norwegian standard date format; day, textual month, and year. The issue has now been solved and the following setting can be used:

Report Designer: Improvements to Expressions and KPI functionality
For this release, we have worked on improving the KPI and Expressions functionality in Report Designer. Specifically, we have implemented the following fixes:
- Possible to create KPIs based on multiple factsets
- KPI and Expression filters now only require quotes if datatype is a string
- Filters now support operators for strings (begins with, ends with, like, contains)
- Possible to use KPIs with multiple expressions.
Report Designer: Groups automatically set to None when a user deselects the Expanding checkbox
We have fixed an issue where users have experienced that the grouping on the Grouping/Sorting tab would still be active even if they deselected the Expanding checkbox. This would cause the group to still expand. The issue is now fixed, so that when a user deselects the Expanding checkbox, the grouping is now automatically set to None.

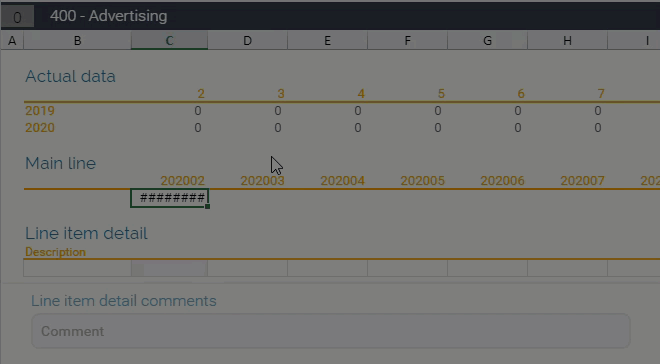
Budgeting: Line Item Details – Expand columns
Users can now expand columns in Line Item Details if they have large numbers that show a number sign, #, due to lack of space in the column.
Live Reporting: Use user’s language when exporting report as PDF
In the past, some users have experienced that the language of their report changes to English when they export a report to pdf. This is now fixed, and reports will now have the same language as the user has set as their language.
Assignments
We have fixed an issue where some users have experienced getting error messages when selecting parameters for their assignments (when the Let User Decide option is selected for parameters in Workflow).