February to April 2019
Version: v5.2.20430.1215
Download the latest version here.
Changes to Administration
We have made some changes to Administration to accommodate larger accounting firms that use Groups to organize their clients.
Search for users
We have developed a new ![]() Search users functionality, where you can search for users and get information about the user, such as email address, which tenants and/or groups they belong to, and if they have administrator rights.
Search users functionality, where you can search for users and get information about the user, such as email address, which tenants and/or groups they belong to, and if they have administrator rights.
To search for a user;
- Click Settings > Administration.
- Click
 Search users.
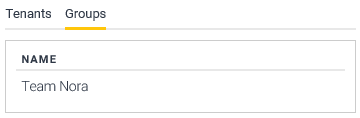
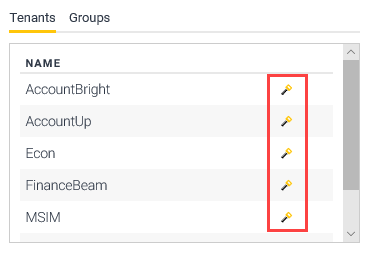
 - In the Search for users dialog, click the Tenants and Groups tabs to see which group and/or tenant the user has access to.

NOTE: If you see a ![]() Key icon next to the tenant or group, that means the user has administrator rights in that group or tenant.
Key icon next to the tenant or group, that means the user has administrator rights in that group or tenant.
Changes to the Group level
We have also made some changes to the ![]() Group level.
Group level.
For larger organizations, such as accounting firms, it can be useful to organize the tenants into groups. In this way, it is easier for an administrator to add a user to multiple tenants, and giving them permissions and data accesses.
For the Group level ![]() , you now see the tabs shown in the figure:
, you now see the tabs shown in the figure:

| Tab | Description | |
|
1 |
Overview |
Shows the group name. Click |
|
2 |
Group users |
Shows users that have access to the group level. You can add or remove group users. These users will have access to all tenants in the group and will automatically get access to manage other subgroups and tenants within the hierarchy. |
|
3 |
Licensing |
Allocate licenses for users at the group level.
NOTE: If you do not have a shared license, you will not see this tab. |
Manage group users
Add group users
A group user is a user who can access all tenants in a group.
- Click Settings > Administration.
- At the
 Group level, click the Group users tab.
 - In the Add group user field, enter the email address and click
 Add. An invitation e-mail is sent to the new user’s e-mail. The new users will automatically get Tenant Administrator rights.
NOTE: If you want to grant a user Group Administrator rights, turn on the ![]() Group Administrator switch. A Group Administrator can manage group users, and create new tenants and subgroups. In addition, they can manage licenses at the group level.
Group Administrator switch. A Group Administrator can manage group users, and create new tenants and subgroups. In addition, they can manage licenses at the group level.
NOTE: If you want to grant a user all permissions for all tenant in the group, turn on the ![]() All tenant permission switch. This permission gives the user administrator rights for all tenants in the group. In this way, they can manage licenses, users, and roles at the tenant level.
All tenant permission switch. This permission gives the user administrator rights for all tenants in the group. In this way, they can manage licenses, users, and roles at the tenant level.
Manage licenses for users at the group level
- Click the Licensing tab.
- Use the
 checkboxes to give module access to group users.
NOTE: Licenses for group users is managed from here and not at the tenant level. At the tenant level, the module accesses will be locked when a user is a group user.
NOTE: You can see how many available licenses you have in the column headers.
To see an example on how you can use the Group level, see Organize tenants in groups: An example.
Tenant level permissions and accesses inherited from group level
Because you now can add users to a tenant by adding them at the Group level, there are some changes to the permissions, data and module access settings on the Users tab at the Tenant level.
If a user is a Group User, he or she will have a ![]() Lock icon next to their names on the Users tab. If the user is given All tenant permissions at the Group level, or is a Group Administrator, their permissions and data access is inherited from the Group level and cannot be managed from the Tenant level.
Lock icon next to their names on the Users tab. If the user is given All tenant permissions at the Group level, or is a Group Administrator, their permissions and data access is inherited from the Group level and cannot be managed from the Tenant level.
Module access is always given at the Group level for Group Users.

Organize tenants in groups by drag-and-drop
You can now use drag-and-drop to organize the tenants in your groups in the tree structure. You can, for example, move your tenants from one group to another. In addition, you can have a tenant in multiple groups if you want. When you move or add a tenant to a group, the group users are automatically added to the tenant you add or move.
NOTE: This functionality is only available for users with shared licenses.
Move tenant to another group
To move a tenant to another group;
- Click the tenant and drag it to the group header.
- Select the Move here option.
The group users in the destination group will automatically be added as tenant users.
NOTE: If you move a tenant from one group to another, the group users from the original group are removed from the tenant.
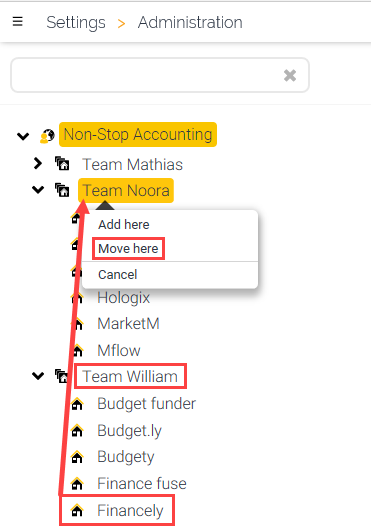
In the example in the figure, we move the Financely tenant under the Team William group to the Team Noora group. All group users from Team William are removed and the group users in Team Noora will be added.
Add tenant to another group
To add a tenant to another group, while keeping the tenant in the original group;
- Click the tenant and drag it to the group header.
- Select the Add here option.
You will now have the tenant in both groups.
The group users will automatically be added as tenant users.

In the example in the figure, we add the Financely tenant under the Team William group to the Team Noora group. In this way, we have the Financely tenant under both the Team William group and the Team Noora group. The group users for Team Noora will be added, and the group users for Team William are kept.
Add multiple tenants more quickly
We have changed the Add tenants dialog box, so it does not close for each tenant you add. In the past, the dialog box would close when you clicked the Create button. Now, the dialog box stays open so you can add multiple tenants until you click the Close button.
Possible to search for users on tenant level
We have added a Search users functionality to the Tenant level in Administration that allows you to only search for users in that particular tenant.
To search for a user;
- Click Settings > Administration.
- Click the Users tab.
- In the Search or add users field, start typing the name.

Marketplace: Possibility to have your own Marketplace
It is now possible to create your own Marketplace for report templates. This is a feature we mainly offer to accounting firms as it requires OneStop Reporting to set up a separate tenant for this purpose. When you have a Marketplace tenant, you can upload templates to this marketplace and share between your tenants. The users in the other tenants will then only see the report templates you have shared when they click ![]() Get templates in Live Reporting or Budgeting. Please contact support.osr@visma.com if you want to set up a Marketplace tenant.
Get templates in Live Reporting or Budgeting. Please contact support.osr@visma.com if you want to set up a Marketplace tenant.
Help improvements
- We have made the context-sensitive help accessible for Internet Explorer users. In the past, the Help pane did not work properly for Internet Explorer users.
- We have improved the Search functionality. In the past, the search results did not display properly when users entered search terms in the Search field. In addition, we have enabled the search functionality for users with Norwegian interface.
- We have also made some improvements to the appearance of the Help when users open the help in the browser.

Publisher: Publisher jobs will now run at correct time if the server time differs from UTC time
We have fixed an issue where Publisher jobs would run at incorrect times if the server time differed from UTC-time.
Administration: Delete companies dialog box
We have changed the dialog box for deleting companies from a tenant in Administration to be more informative. The change has been implemented to make users aware of what happens when they delete a company.

Live Reporting: Today’s date the default date in report templates
In Live Reporting, if the parameter is a date picker, today’s date is now automatically set.

Get Data: Search for companies when creating a connection
We have added a Search for companies field when users create a new or edit an existing connection in the Get Data module.

Improved error messages in Data Connection
We have improved the validation process for data connections. In this way, users will get more detailed error messages with information about the cause of the error.
Service automatically to start on server reboot
In the past, customers have experienced that the OSR services do not start automatically after server reboot. This would cause reports not being run until the services were manually started again. We have solved this by setting the services to Automatic (Delayed Start) in the installer.
Added Active Directory validation
We have improved the Active Directory validation process.
To add Active Directory users to OneStop Reporting, see Active Directory.
Fixes
- Report Designer: We have fixed an issue where some users experienced that Report Designer would crash if they selected a range, changed color for the range, and ran the report.
- Report Designer: Solved translation issue for period functions: We have fixed an issue where some customers with Norwegian user interface would get a mix of English and Norwegian terms in the Period Functions menu.
- Report Designer: Fix for users with proxy servers: In the past, some users have experienced authentication failure when attempting to edit reports in Report Designer from portals sitting behind proxy servers. The issue is now fixed.
- Voucher viewer: We have fixed an issue where the voucher viewer would crash when the user had unsupported files. Now, the voucher viewer will show a message «File format not supported: <format>» or «File conversion failed: <format>» if the voucher viewer is mapped to unsupported file types.
Integration-specific fixes
Visma Business and Visma Global
- Added period functions: We have added these period functions:
- Last Quarter Last Year
- Next Quarter Last Year
- Quarter to Date Last Year
Visma Business
- We have changed display names in Group Reporting and edited the terms for all languages.
- Drill-down: We have moved the voucher link to the left so the link is easier to access when customers do a drill-down:

Visma Admin
- We have fixed an issue that caused errors in drilldown for some customers.
- We have fixed an issue where some customers experienced only being able to view data from the connection company.
- We now have support for creating consolidated reports.
Visma Global
- Added period functions: We have added some period function to Visma Global. The period functions are now consistent between Visma Global, Visma Business, Visma Lønn, and Visma Administration.